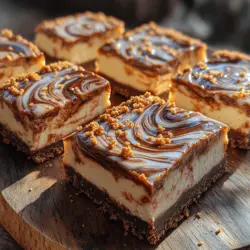
Nutella Dream Cheesecake Bars are the ultimate dessert for chocolate lovers and cheesecake enthusiasts alike. Imagine biting into a creamy, rich cheesecake that is perfectly complemented by the deliciously indulgent flavor of Nutella. This dessert combines the best of both worlds, making it a perfect treat for any occasion. Whether you’re planning a special gathering or simply craving something sweet, these bars promise to be a crowd-pleaser that will leave everyone asking for seconds.
The beauty of Nutella Dream Cheesecake Bars lies not only in their incredible flavor but also in the ease of preparation. They are a delightful fusion of textures and tastes, where the creamy filling meets a buttery crust, and a luscious Nutella swirl adds visual appeal. This article will guide you through the entire process of creating these delicious cheesecake bars from scratch. You’ll learn about the essential ingredients, their roles in achieving the perfect cheesecake, and step-by-step instructions for preparation and baking.
Understanding the Ingredients and Their Roles
To create the perfect Nutella Dream Cheesecake Bars, it’s essential to understand the ingredients that will come together to form this delectable dessert. Each component plays a significant role in texture, flavor, and overall success of the recipe.
Exploring the Crust Components
The crust of the Nutella Dream Cheesecake Bars provides a deliciously crunchy base that contrasts beautifully with the creamy filling. Here are the key ingredients that make up this essential layer:
– Graham Cracker Crumbs: The primary component of the crust is graham cracker crumbs. These crumbs contribute a wonderful texture and a hint of sweetness. The slight nuttiness of graham crackers complements the rich flavors of the cheesecake beautifully. When crushed finely, they help to create a sturdy base that can support the creamy filling without crumbling apart.
– Unsalted Butter: Unsalted butter is crucial for flavor and binding the crust ingredients together. It adds richness and helps to achieve that desired crumbly texture. By using unsalted butter, you can control the overall salt content of your dessert, allowing the sweetness of the cheesecake and Nutella to shine through.
– Granulated Sugar: A small amount of granulated sugar is added to enhance the sweetness of the crust. The sugar helps to balance the flavors and provides a slight caramelization when baked, resulting in a golden-brown crust that is both flavorful and visually appealing.
Delving into the Cheesecake Filling
The cheesecake filling is the star of the show, and it’s essential to use the right ingredients to achieve that creamy, dreamy texture. Here’s a breakdown of the filling components:
– Cream Cheese: Cream cheese is the base of any cheesecake, providing that characteristic creamy texture and tangy flavor. When beaten, it becomes smooth and velvety, forming the perfect canvas for the other ingredients. It’s essential to use full-fat cream cheese for the best results, as it contributes to the richness of the bars.
– Sugar: Sugar is not just for sweetness; it also helps to create a smooth texture by dissolving in the cream cheese. The right amount of sugar enhances the flavors without overpowering the cheesecake.
– Sour Cream: Adding sour cream to the filling introduces a tangy flavor that balances the sweetness of the sugar and cream cheese. Additionally, sour cream contributes to the creaminess and moisture of the cheesecake, ensuring a luscious mouthfeel.
– Vanilla Extract: A splash of vanilla extract elevates the flavor profile of the cheesecake filling. The warm, aromatic notes of vanilla complement the richness of the cream cheese and the sweetness of the sugar, creating a well-rounded dessert.
– Eggs: Eggs are essential for the structure of the cheesecake. They act as a binding agent, helping the filling set properly during baking. Be sure to use fresh eggs for the best results, as they provide the necessary stability and richness.
The Nutella Swirl: A Decadent Addition
No Nutella Dream Cheesecake Bars would be complete without the signature Nutella swirl that adds both flavor and visual appeal. Here’s why Nutella is a crucial ingredient in this recipe:
– Flavoring and Aesthetics: Nutella is a rich chocolate-hazelnut spread that brings an indulgent flavor to the cheesecake. Its creamy consistency allows it to be swirled into the cheesecake batter, creating beautiful marbled patterns. The combination of chocolate and hazelnut enhances the overall taste and makes each bite a delightful experience.
– Texture and Visual Appeal: The Nutella swirl adds an enticing texture to the cheesecake bars. As the bars bake, the Nutella becomes slightly melty, creating pockets of gooeyness that contrast perfectly with the creamy filling. Visually, the chocolate swirls against the pale cheesecake create a stunning presentation that is sure to impress.
Step-by-Step Guide to Making Nutella Dream Cheesecake Bars
Now that you have a solid understanding of the ingredients and their roles, it’s time to dive into the preparation process. Here’s a step-by-step guide to help you create the perfect Nutella Dream Cheesecake Bars.
Prepping Your Kitchen: Equipment and Tools
Before you start baking, it’s essential to gather all the necessary equipment and tools to ensure a smooth cooking process. Here’s what you’ll need:
– 9×9-inch Baking Pan: A square baking pan is ideal for this recipe. It allows for even baking and provides the perfect size for cutting the bars after baking.
– Mixing Bowls: You’ll need a few mixing bowls for combining the crust and filling ingredients. Using different sized bowls will help keep your ingredients organized.
– Electric Mixer or Whisk: For the cheesecake filling, an electric mixer is recommended to achieve a smooth and creamy texture. If you don’t have one, a whisk works too; just be prepared for a bit of extra arm workout!
– Spatula: A rubber spatula will be your best friend for scraping down the sides of the mixing bowl and folding in the Nutella swirl.
– Parchment Paper: Line your baking pan with parchment paper for easy removal of the bars once they’re baked. This will also help with cleanup.
– Measuring Cups and Spoons: Accurate measurements are crucial for baking success, so have your measuring cups and spoons ready.
Creating the Perfect Crust
1. Preheat the Oven: Start by preheating your oven to 325°F (160°C). This ensures the cheesecake bakes evenly and sets properly.
2. Prepare the Baking Pan: Line your 9×9-inch baking pan with parchment paper, allowing some overhang on the sides. This will make it easier to lift the bars out after baking.
3. Combine the Crust Ingredients: In a mixing bowl, combine 1 and 1/2 cups of graham cracker crumbs, 1/4 cup of granulated sugar, and 1/2 cup of melted unsalted butter. Stir until the mixture resembles wet sand, ensuring all the crumbs are evenly coated with butter.
4. Press the Mixture into the Pan: Pour the crust mixture into the prepared baking pan. Using the back of a measuring cup or your hands, press the mixture firmly and evenly into the bottom of the pan. This will create a solid base for your cheesecake filling.
5. Bake the Crust: Place the pan in the preheated oven and bake for about 10 minutes, or until the crust is lightly golden. Allow it to cool slightly while you prepare the cheesecake filling.
With the crust ready, you are now one step closer to indulging in the creamy goodness of Nutella Dream Cheesecake Bars. Stay tuned for the next part of the recipe, where we’ll dive into creating the luscious cheesecake filling and the irresistible Nutella swirl that will elevate this dessert to new heights.
Mixing and Pressing the Crust
To create the foundation for your Nutella Dream Cheesecake Bars, you need a crust that strikes the perfect balance between buttery richness and structural integrity. Start by melting your butter in a microwave-safe bowl. Once melted, allow it to cool slightly before incorporating it into the graham cracker crumbs.
Detailed Steps for Mixing the Crust:
1. Combine Ingredients: In a medium mixing bowl, combine 1 ½ cups of graham cracker crumbs with ¼ cup of granulated sugar. This combination will provide a sweet base that perfectly complements the creamy cheesecake filling.
2. Incorporate Butter: Gradually pour the melted butter into the crumb mixture while stirring continuously. The goal is to create a texture similar to wet sand; it should hold together when squeezed. If the mixture feels too crumbly, add a bit more melted butter, one tablespoon at a time.
3. Pressing the Crust: Transfer the crumb mixture into a lined 9×9-inch baking pan. Use the back of a measuring cup or your hands to press the mixture firmly and evenly across the bottom of the pan. Ensure that the crust is compact and level to support the cheesecake filling.
Optimal Baking Time and Temperature for Crust Perfection
Achieving the ideal crust requires precise baking. Preheat your oven to 350°F (175°C). Bake the crust for about 10 minutes, or until it begins to turn golden brown. This short baking time ensures the crust remains crisp and does not become too hard after the cheesecake is added.
Once baked, remove the crust from the oven and allow it to cool while you prepare the cheesecake filling. This step is crucial, as a warm crust can negatively affect the overall texture of the dessert.
Crafting the Cheesecake Filling
Now comes the star of the show: the cheesecake filling. To ensure a smooth and creamy texture, it is essential to follow these techniques carefully.
Techniques for Achieving a Smooth Filling Without Lumps:
1. Room Temperature Ingredients: Start by ensuring that your cream cheese is at room temperature. Cold cream cheese will not blend smoothly and can create lumps. Leave it out for about 30 minutes before you begin mixing.
2. Mixing Process: In a large mixing bowl, beat the cream cheese using an electric mixer on medium speed until it is creamy and smooth. This will take about 2-3 minutes. Scrape down the sides of the bowl to ensure all the cream cheese is incorporated.
3. Gradual Incorporation: Gradually add in the granulated sugar, mixing well after each addition. This helps to dissolve the sugar completely and contributes to a creamy filling.
4. Adding Other Ingredients: Next, add in the eggs, one at a time, mixing well until each is fully incorporated before adding the next. Finally, add the vanilla extract and sour cream, mixing just until combined.
Swirling Nutella for Visual Appeal
One of the most exciting aspects of this recipe is the Nutella swirl that creates a stunning visual effect, making your cheesecake bars irresistible.
Techniques for Creating a Beautiful Marbled Effect:
1. Nutella Preparation: Warm your Nutella slightly in the microwave (about 10-15 seconds) to make it easier to swirl. Be careful not to overheat it; you want it just soft enough to drizzle.
2. Swirling Technique: Pour half of the cheesecake filling into the prepared pan over the cooled crust. Spoon dollops of Nutella over the filling, then gently swirl it with a knife or a skewer. Add the remaining cheesecake filling on top and repeat the process with the remaining Nutella.
3. Controlling the Swirl: To achieve a marbled effect without overmixing, use a gentle hand. A few swirls are often enough; you want to see distinct Nutella ribbons rather than a uniform color.
Baking and Cooling: The Final Steps
Now, it’s time to bake the cheesecake bars. Proper baking and cooling are essential for achieving the right texture and flavor.
Indicators for Knowing When the Cheesecake is Done:
1. Baking Conditions: Bake the cheesecake bars in the preheated oven at 325°F (163°C) for about 30-35 minutes. The edges should appear set, but the center may still be slightly jiggly. This slight jiggle is a good indicator that the bars will firm up as they cool.
2. Cooling Process: Once baked, turn off the oven and crack the oven door open. Allow the cheesecake to cool inside the oven for about one hour. This gradual cooling helps prevent cracking on the surface.
3. Refrigeration: After it has cooled at room temperature, cover the pan with plastic wrap or aluminum foil and refrigerate for at least 4 hours, or overnight if possible. This chilling step is crucial for firming the cheesecake and allowing the flavors to meld.
Serving and Enjoying Your Cheesecake Bars
After all the hard work, it’s time to enjoy your Nutella Dream Cheesecake Bars!
Presentation Ideas:
1. Creative Cutting: Using a sharp knife, cut the chilled cheesecake into squares or rectangles. For clean cuts, dip the knife in hot water and wipe it dry before each cut.
2. Garnishing: Consider garnishing with a drizzle of melted Nutella or a sprinkle of crushed hazelnuts for added texture. A dusting of powdered sugar can also enhance the visual appeal.
3. Beverage Pairing: These cheesecake bars pair beautifully with coffee, tea, or even a glass of dessert wine. For a more decadent experience, serve them with a scoop of vanilla ice cream.
Flavor Variations and Customizations
While the Nutella swirl is a showstopper, don’t hesitate to get creative with your cheesecake bars. Here are some ideas for flavor variations:
1. Alternative Toppings: Instead of Nutella, try using a different chocolate spread, caramel sauce, or fruit preserves. A raspberry or strawberry swirl can add a delightful tartness.
2. Seasonal Ingredients: During the fall, consider adding a touch of pumpkin spice to the cheesecake filling for a seasonal twist. In the summer, fresh berries can be folded into the filling or used as a topping.
3. Mix-Ins: Incorporate crushed cookies, toffee bits, or chopped nuts for added texture within the filling.
Conclusion: The Sweet Satisfaction of Nutella Dream Cheesecake Bars
Nutella Dream Cheesecake Bars are not just a dessert; they are an experience that combines rich flavors and creamy textures. With their straightforward preparation process and stunning results, these bars are sure to become a staple in your dessert repertoire. By following the detailed steps outlined in this article, you’ll be able to create a delicious treat that brings joy to any gathering or moment of indulgence. Enjoy the delightful blend of cheesecake and Nutella, and remember, each bite is a sweet dream come true.