Introduction
If you’re on the lookout for a dessert that can elevate any gathering, look no further than the delightful Cherry Coconut Dream Bars. This sumptuous treat combines the tartness of ripe cherries with the sweet, tropical notes of coconut, creating a harmonious flavor profile that is nothing short of heavenly. Ideal for both casual get-togethers and more special celebrations, these dream bars are sure to impress your guests and leave them craving more.
The magic of Cherry Coconut Dream Bars lies in their versatility. Whether it’s a summer picnic, a holiday potluck, or an afternoon tea with friends, these bars are perfect for any occasion. They promise to be a hit with both those who love fruity desserts and those who appreciate the rich, velvety taste of coconut. With the right balance of sweet and tart, these bars offer a refreshing twist that is perfect for any palate.
The Allure of Cherry Coconut Dream Bars
Dessert bars have a unique appeal that sets them apart from traditional cakes and pastries. One of the primary advantages of bars is their ease of serving; they can be cut into perfectly portioned squares, making them ideal for serving at parties or gatherings. This means no fussing with slicing cake or worrying about uneven portions. It’s as simple as cut and serve, allowing you to spend more time enjoying the company of your guests.
What makes Cherry Coconut Dream Bars particularly special is their unique combination of flavors. The tart cherries create a bright burst of flavor that is beautifully complemented by the rich, sweet coconut. This pairing not only tastes incredible but also adds a visual appeal with its vibrant colors. The texture contrast is equally enticing—each bite offers a satisfying crunch from the crumbly crust, a creamy filling that melts in your mouth, and a light, airy topping that adds a finishing touch of decadence.
Understanding the Ingredients
To create these delightful Cherry Coconut Dream Bars, it’s crucial to understand the role of each ingredient in the recipe. This knowledge not only helps in achieving the best flavor and texture but also allows you to make informed substitutions if necessary.
For the Crust
The crust is the foundation of your Cherry Coconut Dream Bars, providing both structure and flavor. Here’s a breakdown of the key ingredients:
– All-Purpose Flour: This forms the base of your crust, giving it a sturdy yet tender texture.
– Powdered Sugar: Unlike granulated sugar, powdered sugar dissolves easily, lending a smooth sweetness to the crust without any graininess.
– Unsalted Butter: Using unsalted butter is crucial for a balanced flavor. It allows you to control the saltiness of the dessert, ensuring that the sweetness of the filling and coconut shines through.
– Salt: A pinch of salt enhances the overall flavor of the crust, balancing out the sweetness.
For the Filling
The filling is where the magic truly happens, bringing together the flavors that define the Cherry Coconut Dream Bars. The key ingredients for the filling include:
– Sweetened Shredded Coconut: This ingredient not only adds sweetness but also contributes a chewy texture that contrasts beautifully with the creamy filling.
– Cherry Pie Filling: This premade filling simplifies the process while ensuring a burst of cherry flavor in every bite.
– Eggs: Eggs act as a binding agent, providing structure and richness to the filling.
– Granulated Sugar: This enhances the sweetness, balancing the tartness of the cherries.
– Vanilla Extract: A splash of vanilla adds depth of flavor, complementing the cherry and coconut beautifully.
For the Topping
The topping is the crowning glory of your Cherry Coconut Dream Bars, providing a light and luxurious finish. The ingredients for the topping are:
– Heavy Cream: This is essential for creating a rich and creamy topping. The high-fat content allows it to whip up beautifully, forming soft peaks that hold their shape.
– Powdered Sugar: This sweetens the cream without weighing it down, ensuring a light and fluffy texture.
– Vanilla Extract: Just like in the filling, vanilla extract adds an aromatic quality that enhances the overall flavor profile of the bars.
Step-by-Step Instructions to Create Cherry Coconut Dream Bars
Preheat the Oven
Before you begin mixing your ingredients, it’s essential to preheat your oven. Preheating is a crucial step in baking that ensures your dessert cooks evenly. A properly heated oven allows the crust to rise and set correctly without becoming dry or overcooked. Preheat your oven to 350°F (175°C), and let it warm up while you prepare the crust.
Making the Crust
Now that your oven is preheated, it’s time to make the crust. This simple yet delicious base sets the stage for the rest of your Cherry Coconut Dream Bars. Follow these detailed instructions:
1. Combine the Dry Ingredients: In a mixing bowl, whisk together 1 cup of all-purpose flour and 1/2 cup of powdered sugar until well combined. This ensures that the sweetness is evenly distributed throughout the crust.
2. Add the Butter: Cut 1/2 cup of unsalted butter into small cubes and add it to the flour mixture. Using a pastry cutter or your fingertips, work the butter into the flour mixture until it resembles coarse crumbs. It’s important not to overwork the dough; you want small bits of butter to remain for a flaky texture.
3. Season with Salt: Sprinkle in 1/4 teaspoon of salt and mix briefly to combine. The salt will enhance the flavor of the crust without overpowering the sweetness.
4. Press into the Pan: Grease a 9×9-inch baking dish with cooking spray or butter. Transfer the crust mixture into the dish, using your fingers or the back of a measuring cup to press it evenly across the bottom of the pan. Make sure it’s compact and smooth, as this will create a sturdy base for your bars.
5. Bake the Crust: Place the baking dish in the preheated oven and bake for about 15 minutes, or until the edges are lightly golden. This initial baking step helps set the crust before adding the filling.
Once the crust is baked to perfection, let it cool slightly while you prepare the filling. The next steps will guide you through creating the creamy, dreamy cherry coconut filling that will transform your crust into a delightful dessert.
Tips for Achieving the Perfect Crust Texture
To create a delicious base for your Cherry Coconut Dream Bars, focusing on the crust texture is crucial. A perfect crust should be both flaky and sturdy enough to hold the filling without becoming soggy. Here are some essential tips to ensure your crust turns out just right:
1. Chill Your Ingredients: Use cold butter when making the crust. This helps create a flaky texture as the butter melts during baking. Additionally, chill the mixed dough for about 30 minutes before rolling it out. This rest period allows the gluten to relax, leading to a tender crust.
2. Don’t Overwork the Dough: When combining the ingredients for your crust, mix until just combined. Overworking the dough can lead to a tough crust, which is not what you want for these dream bars.
3. Use Parchment Paper: Line your baking dish with parchment paper, allowing for easy removal of the bars once baked. This not only helps with cleanup but also ensures the edges don’t get overly browned.
4. Pre-bake the Crust: For a firmer base, consider pre-baking the crust for about 10-12 minutes at 350°F (175°C) before adding the filling. This step helps create a barrier that keeps the crust crispy while the filling bakes.
Preparing the Filling
Once you have your crust ready, it’s time to prepare the cherry filling. This step is where you can truly customize and enhance the flavor of your Cherry Coconut Dream Bars.
1. Mixing the Filling Ingredients: In a medium bowl, combine the cherries (fresh or canned), sugar, cornstarch, vanilla extract, and a pinch of salt. If you’re using fresh cherries, make sure they are pitted and chopped into small pieces for even distribution throughout the bars. For canned cherries, drain them well to prevent excess moisture. Stir the mixture gently but thoroughly until the cherries are well-coated in the sugar and cornstarch. This will help thicken the filling as it bakes.
2. Enhancing Flavor: For an extra burst of flavor, consider using homemade cherry pie filling instead of canned. Homemade fillings allow you to control the sweetness and texture, resulting in a more authentic taste. If you prefer a tropical twist, add a splash of almond extract to complement the coconut flavor.
Assembling the Bars
With your crust and filling ready, it’s time to bring these two components together.
1. Pouring and Spreading the Filling: Once your crust is baked (if pre-baking), remove it from the oven and let it cool slightly. Carefully pour the cherry filling over the warm crust, ensuring it spreads evenly. Use a spatula to gently distribute the filling, making sure the cherries are evenly scattered across the surface.
2. Importance of an Even Layer: It’s essential to ensure that the filling is spread into an even layer. This will promote uniform baking and ensure that every bite of the bars has a balanced flavor of cherries and coconut. An uneven layer can lead to some areas being overcooked while others are undercooked.
Baking the Bars
Now that your bars are assembled, it’s time to bake them to perfection.
1. Baking Time and Visual Cues: Bake the Cherry Coconut Dream Bars in a preheated oven at 350°F (175°C) for about 25-30 minutes. Keep an eye on them as they bake; the filling should bubble slightly, and the edges of the crust should turn a nice golden brown. The center may still look a bit jiggly, and that’s okay, as it will continue to set as it cools.
2. Cooling for Best Texture: Once they are done baking, remove the bars from the oven and allow them to cool completely in the pan on a wire rack. This step is crucial—if you cut them too soon, the filling may not have set properly, resulting in a messy presentation. For the best texture, let the bars cool for at least 1 hour at room temperature and then refrigerate for an additional 2 hours before slicing.
Creating the Topping
While the bars are cooling, you can prepare the topping to elevate your dessert even further.
1. Whipping Cream to the Right Consistency: In a mixing bowl, pour heavy cream and add a tablespoon of powdered sugar along with a splash of vanilla extract. Using an electric mixer, whip the cream on medium speed until soft peaks form. Be careful not to over-whip, as you want a light and airy topping rather than butter.
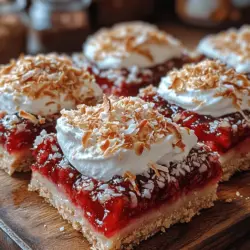
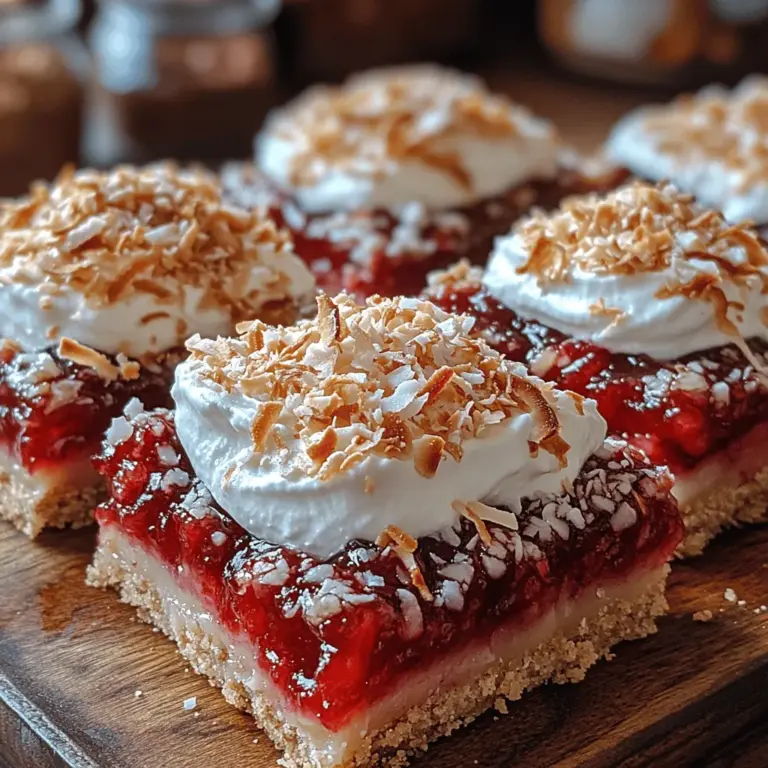
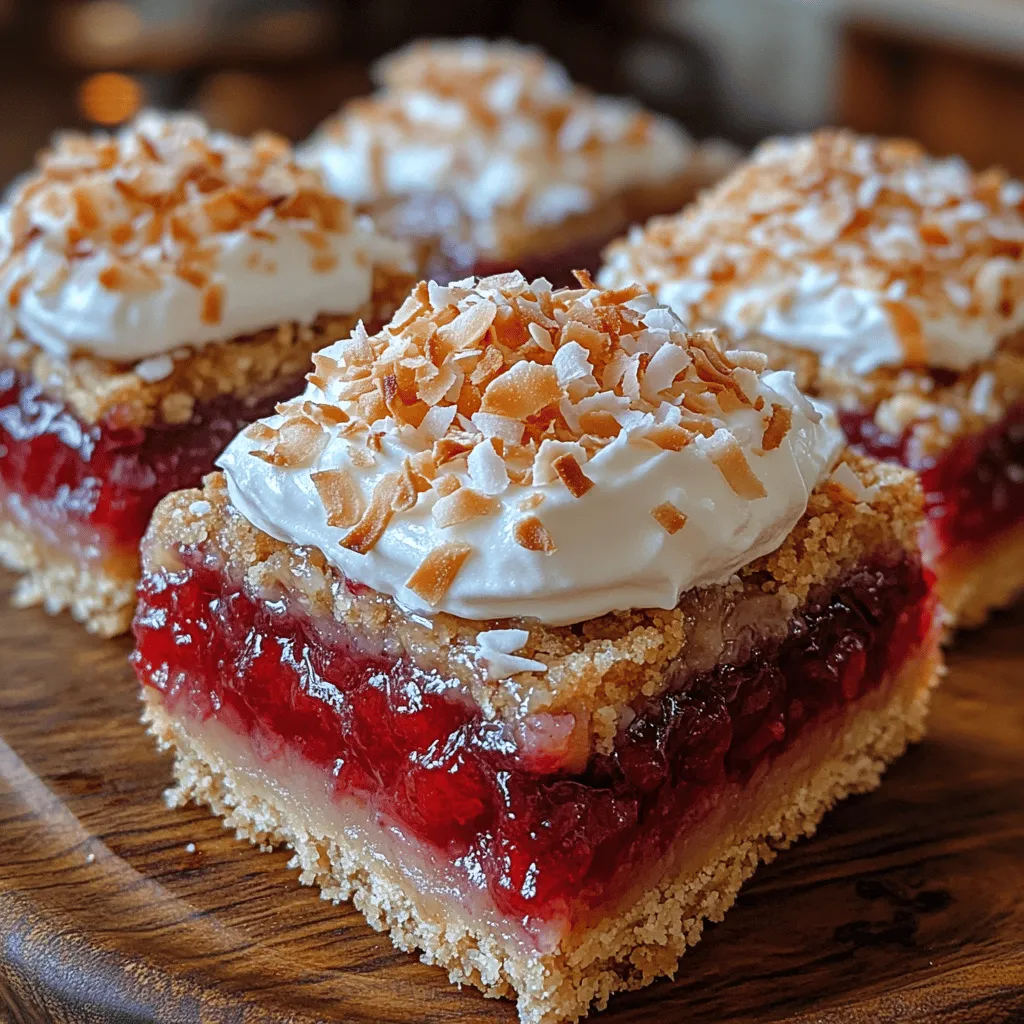
2. Garnishing with Toasted Coconut: For a beautiful finish, toast some shredded coconut in a dry skillet over medium heat until golden brown, stirring frequently to prevent burning. Sprinkle the toasted coconut over the whipped cream-topped bars for added texture and a delightful crunch.
Serving Suggestions
Your Cherry Coconut Dream Bars are now ready to be enjoyed! Here are some ideas for serving them at various events:
1. Event Ideas: These dreamy bars are perfect for summer picnics, birthday parties, and holiday gatherings. Their vibrant colors and tropical flavors make them an attractive dessert option that appeals to a wide range of tastes.
2. Pairing Options: Consider pairing your bars with a cup of coffee, a refreshing iced tea, or even a sweet dessert wine. The rich cherry and coconut flavors complement these beverages beautifully, enhancing the overall dessert experience.
3. Presentation Ideas: When serving, cut the bars into squares or rectangles and arrange them on a decorative platter. You might also consider placing them in cupcake liners for a more elegant touch. A sprinkle of powdered sugar over the top just before serving adds a finishing touch that looks great on any dessert table.
Storage and Shelf Life
To maintain the freshness and quality of your Cherry Coconut Dream Bars, follow these storage tips:
1. Best Practices for Storing: Store the bars in an airtight container in the refrigerator. This helps retain moisture and keeps the crust from becoming stale. If you prefer, you can layer parchment paper between the bars to prevent them from sticking together.
2. Shelf Life: When stored properly, Cherry Coconut Dream Bars will last for up to a week in the refrigerator. However, for the best flavor and texture, consume them within the first few days.
3. Freezing for Longer Storage: If you want to make these bars in advance, they freeze well. Wrap individual bars in plastic wrap and place them in a freezer-safe container. They can be frozen for up to three months. When you’re ready to enjoy them, simply thaw in the refrigerator overnight.
Conclusion
Making Cherry Coconut Dream Bars is a delightful experience that combines simple ingredients into a stunning dessert. The process of creating a flavorful crust, luscious cherry filling, and light whipped topping is both rewarding and enjoyable. These bars are not only pleasing to the palate but also to the eyes, making them a fantastic addition to any gathering.
We invite you to try this recipe and experience the deliciousness of these Cherry Coconut Dream Bars for yourself. Whether you serve them at a special occasion or simply indulge in a sweet treat at home, the combination of flavors and textures is sure to impress. Enjoy the satisfaction of baking and sharing these delightful bars with family and friends!