Introduction
If you’re a fan of cinnamon rolls but find the traditional process a little too time-consuming, then you’re in for a treat with these Cinnamon Roll Bliss Bars. This delightful dessert merges the classic flavors of cinnamon rolls with the convenience of a bar format, making it a perfect option for casual family gatherings, indulgent brunches, or even as a sweet afternoon pick-me-up. The combination of buttery dough, gooey cinnamon filling, and a luscious cream cheese frosting creates a dessert that is not only visually appealing but also irresistibly delicious.
What sets these Cinnamon Roll Bliss Bars apart is their simplicity. This recipe is designed to be accessible for bakers of all skill levels, from the novice in the kitchen to the seasoned pro. With straightforward instructions and common ingredients, you can whip up these bars without the fuss, ensuring that everyone can enjoy a sweet treat without spending hours in the kitchen.
Get ready to impress your family and friends with these irresistible bars that promise to deliver the comforting flavors of cinnamon rolls in a fraction of the time.
Understanding the Ingredients
To create the perfect Cinnamon Roll Bliss Bars, it’s essential to understand the key ingredients that contribute to their delightful flavor and texture. Here’s a breakdown of what you’ll need:
1. **All-Purpose Flour**
All-purpose flour serves as the backbone of the batter. It provides structure and stability to the bars. For the best results, consider using a high-quality brand to ensure a light and fluffy texture. If you’re looking for a gluten-free alternative, a 1:1 gluten-free baking flour can work well, though adjustments may be needed for moisture.
2. **Granulated Sugar**
Sugar not only sweetens the bars but also enhances the overall flavor. It helps in achieving that signature caramelization during baking, which contributes to the bars’ beautiful golden-brown color. Opt for organic granulated sugar if possible, as it tends to have a cleaner taste and is free from additives.
3. **Brown Sugar**
Using brown sugar in addition to granulated sugar adds depth of flavor and a hint of molasses, enriching the cinnamon filling. The moisture from brown sugar also contributes to a chewier texture, which is essential for these blissful bars.
4. **Cinnamon**
Cinnamon is the star of the show, providing the warm, cozy flavor that pairs so perfectly with the sweetness of the bars. Use freshly ground cinnamon for the best flavor, as its potency diminishes over time. If you want to elevate the flavor profile, you can experiment with Saigon cinnamon, which tends to be spicier and more aromatic.
5. **Butter**
Butter is crucial for creating a rich, moist texture in the bars. Use unsalted butter to control the saltiness of the final product. For a vegan alternative, you can substitute it with a plant-based butter.
6. **Eggs**
Eggs help bind the ingredients together and provide moisture, contributing to the tenderness of the bars. If you prefer to make a vegan version, you can replace eggs with flaxseed meal mixed with water or a store-bought egg substitute.
7. **Baking Powder**
Baking powder is the leavening agent that helps the bars rise during baking. Ensure that your baking powder is fresh for optimal results.
8. **Cream Cheese**
For the frosting, cream cheese provides a tangy flavor that balances the sweetness of the bars. Make sure your cream cheese is softened to room temperature for easy blending.
9. **Vanilla Extract**
Vanilla extract adds a fragrant note that enhances the overall taste of the bars and frosting. Use pure vanilla extract for the best flavor; imitation vanilla can be less intense.
10. **Milk**
Milk is used in the frosting to achieve the desired consistency. Whole milk works best, but you can substitute with almond milk or any non-dairy milk if you prefer.
By selecting high-quality ingredients, you set the stage for success. Fresh spices, real butter, and quality dairy products significantly enhance the flavor and texture of your Cinnamon Roll Bliss Bars.
Preparation and Baking Process
Now that we’ve covered the essential ingredients, let’s walk through the preparation and baking process step-by-step. This method ensures you achieve the perfect consistency and mouthwatering flavor that will have everyone asking for seconds.
Step 1: Preheat the Oven
Start by preheating your oven to 350°F (175°C). This is a crucial step as it ensures that the bars bake evenly and rise properly, creating that ideal chewy texture.
Step 2: Prepare Your Baking Pan
Grease a 9×13-inch baking pan with butter or line it with parchment paper for easy removal of the bars after baking. If you choose to use parchment paper, make sure to leave some overhang on the sides, which will help lift the bars out of the pan later.
Step 3: Mixing the Dry Ingredients
In a large mixing bowl, combine your all-purpose flour, granulated sugar, brown sugar, baking powder, and cinnamon. Whisk these dry ingredients together until they are well combined. This step is important as it ensures that the leavening agent is evenly distributed throughout the flour, which will help your bars rise uniformly.
Step 4: Creaming the Butter and Sugar
In another bowl, cream together the softened butter and sugars (both granulated and brown) using an electric mixer on medium speed. Beat until the mixture is light and fluffy, which typically takes about 2-3 minutes. This process incorporates air into the batter, which will help create a light texture in the finished bars.
Step 5: Adding Eggs and Vanilla
Add the eggs one at a time to the butter-sugar mixture, beating well after each addition. Then, mix in the vanilla extract. This is where the batter begins to take shape, and the flavors start to meld together.
Step 6: Combining Dry and Wet Ingredients
Gradually add the dry ingredient mixture to the wet ingredients, mixing on low speed until just combined. Be careful not to over-mix, as this can lead to tough bars. The goal is to achieve a thick, slightly sticky batter that holds together well.
Step 7: Creating the Cinnamon Swirl
To make the cinnamon filling, combine softened butter, brown sugar, and cinnamon in a small bowl. Mix until smooth and spreadable. Taking half of the batter, spread it evenly into the prepared baking pan. Next, dollop the cinnamon mixture over the batter, and then take the remaining batter and drop spoonfuls over the cinnamon layer.
Using a knife or a skewer, gently swirl the cinnamon filling into the batter. This technique is key; it ensures that the cinnamon flavor is evenly distributed throughout the bars, creating that signature cinnamon roll experience.
Step 8: Baking the Bars
Place the pan in the preheated oven and bake for about 25-30 minutes, or until a toothpick inserted in the center comes out clean. Keep an eye on the bars as they bake; you want them to be golden brown on the edges while being soft in the center. Avoid over-baking, as this can lead to dry bars.
Step 9: Cooling the Bars
Once baked, remove the bars from the oven and allow them to cool in the pan for about 10-15 minutes. This resting period helps the bars set up properly, making them easier to cut without crumbling.
Step 10: Preparing the Cream Cheese Frosting
While the bars are cooling, you can make the cream cheese frosting. In a mixing bowl, beat together the softened cream cheese and butter until smooth and creamy. Gradually add powdered sugar, mixing until you reach your desired sweetness. For a smoother frosting, add a splash of milk to achieve the perfect consistency.
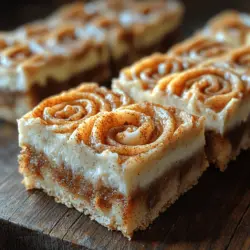
Once the bars have cooled completely, generously spread the cream cheese frosting over the top. The frosting adds a rich and tangy layer that perfectly complements the sweet cinnamon bars, making each bite a blissful experience.
With these detailed instructions, you are well on your way to creating your very own batch of Cinnamon Roll Bliss Bars. The process is straightforward, and the rewards are truly delightful. Whether you’re serving them at a family gathering or enjoying them solo with a cup of coffee, these bars are sure to become a favorite in your dessert repertoire.

Importance of Proper Cooling Before Frosting
After baking the Cinnamon Roll Bliss Bars, it’s crucial to allow them to cool completely before applying the frosting. This step is often overlooked, yet it plays a significant role in the final presentation and taste of the bars. If you frost the bars while they are still warm, the frosting can melt and lose its shape, resulting in a messy and unappetizing appearance. Allowing the bars to cool at room temperature for at least 30 minutes ensures that the frosting adheres properly and retains its creamy texture.
To expedite the cooling process, you can place the pan on a wire rack. This allows air to circulate around the bars, preventing any sogginess and ensuring an even cooling throughout. Once cooled, the bars will be firmer and easier to cut, making for a visually appealing treat that is perfect for sharing.
Suggestions for Cutting and Serving the Bars
When it comes to cutting and serving your Cinnamon Roll Bliss Bars, presentation is key. For the best results, use a sharp knife or a pizza cutter to slice the bars into uniform squares or rectangles. Consider the size of the pieces; while larger portions make for a satisfying dessert, smaller squares are ideal for brunch spreads or gatherings. Aim for a size that allows guests to enjoy one or two bars without feeling overwhelmed.
For an elegant touch, arrange the cut bars on a decorative platter. You can enhance the visual appeal by layering them with parchment paper or using a cake stand for height. Drizzling additional frosting over the top or sprinkling a dash of cinnamon or powdered sugar creates a delightful finishing touch that will impress your guests.
Ideas for Garnishing or Adding Personal Touches
To elevate your Cinnamon Roll Bliss Bars, consider adding personal touches or garnishes before serving. Here are some creative ideas:
– Nuts: Chopped pecans or walnuts add a delightful crunch that complements the soft, gooey texture of the bars.
– Fruits: Fresh berries, such as raspberries or sliced strawberries, can provide a tart contrast to the sweetness of the bars, creating a balanced flavor profile.
– Spices: A light dusting of nutmeg or cardamom can give an aromatic boost that enhances the overall taste.
– Chocolate Drizzle: Melt some dark or white chocolate and use it to drizzle over the top of the bars for an extra layer of flavor and decadence.
Feel free to experiment with these suggestions, and don’t hesitate to mix and match according to your taste preferences.
Healthier Alternatives and Substitutions
If you’re looking to make your Cinnamon Roll Bliss Bars more accommodating to various dietary preferences, there are several ingredient substitutions to consider.
1. Flour Substitutions: For those needing gluten-free options, almond flour or a gluten-free all-purpose blend works well. Keep in mind that the texture may change slightly, potentially resulting in a denser bar, but the flavor will remain delightful.
2. Dairy-Free Options: Substitute dairy butter with coconut oil or a plant-based butter alternative. For the frosting, use a dairy-free cream cheese or a cashew-based frosting for a creamy texture without the dairy.
3. Sweeteners: If you’re looking to cut down on sugar, natural sweeteners like maple syrup or honey can be used. Additionally, coconut sugar can provide a lower glycemic index alternative. Just remember that these alternatives may alter the flavor slightly; for instance, maple syrup can introduce a subtle earthy taste.
4. Reducing Sugar: If reducing sugar without sacrificing taste is your goal, consider using unsweetened applesauce. It not only adds moisture but also enhances the sweetness naturally, allowing you to cut back on added sugars.
Storing and Reheating Cinnamon Roll Bliss Bars
To maintain the freshness and flavor of your Cinnamon Roll Bliss Bars, proper storage is essential. Here are some best practices:
– At Room Temperature: Keep the bars in an airtight container at room temperature for up to three days. This helps preserve their soft texture and delightful taste.
– Refrigeration: For longer storage, you can place the bars in the refrigerator. However, be sure to wrap them tightly in plastic wrap or foil to prevent them from drying out. Refrigerated bars can last up to a week.
– Freezing for Long-Term Storage: If you want to enjoy your Cinnamon Roll Bliss Bars at a later date, freezing is an excellent option. Cut the bars into squares, place them on a baking sheet lined with parchment paper, and freeze until solid. Then transfer the bars to an airtight container or freezer bag, where they can be stored for up to three months.
– Reheating: To enjoy your frozen bars, simply remove them from the freezer and let them thaw in the refrigerator overnight. For a warm treat, pop them in the microwave for about 10-15 seconds or warm them in a preheated oven at 350°F (175°C) for about 5-10 minutes. This will help to restore their soft, gooey texture.
Pairing Suggestions
Cinnamon Roll Bliss Bars are versatile and can be paired with various beverages and dishes, enhancing their flavor profile. Here are some suggestions:
– Beverages: Coffee, especially a rich espresso or latte, pairs wonderfully with the cinnamon flavors. For a refreshing option, consider serving the bars with chai tea, which complements the spices beautifully.
– Brunch Dishes: These bliss bars can shine as a part of a brunch spread alongside fresh fruit, scrambled eggs, or yogurt parfaits. They also make a delightful addition to a cheese board, where the sweetness balances with savory cheeses.
– Seasonal Variations: For special occasions or seasonal gatherings, consider incorporating flavors that match the time of year. Pumpkin spice can be a delightful addition during fall, while fresh citrus zest can brighten the bars in spring.
Conclusion
Baking and enjoying Cinnamon Roll Bliss Bars is a rewarding experience that brings joy not only to the baker but also to all who partake. The delightful blend of cinnamon, sugar, and a creamy frosting creates a blissful treat that is perfect for any occasion.
The recipe’s flexibility allows for various adaptations to suit different tastes and dietary needs, making it accessible to a wider audience. Whether you choose to stick to the classic version or experiment with healthy alternatives, these bars are sure to satisfy cravings and create lasting memories.
Encourage your friends and family to join you in the baking process, sharing in the excitement and satisfaction that comes from creating something truly delicious. Ultimately, the joy of Cinnamon Roll Bliss Bars lies in not just the eating but in the experience of making and enjoying them together with loved ones.