When it comes to comfort food, few dishes can rival the irresistible allure of crispy chicken wings. The combination of juicy meat, a crunchy exterior, and a sweet and savory glaze makes Crunchy Honey Glazed Chicken Wings a standout dish for any occasion. Whether served as a finger-licking appetizer at your next family gathering or as a game day snack to elevate your viewing experience, these wings promise to deliver a flavor-packed punch that will leave your guests coming back for more.
The appeal of these wings lies not only in their taste but also in their texture. Achieving the perfect crunch is essential, as it provides a delightful contrast to the tender chicken meat. The honey glaze, infused with a medley of spices, serves to enhance the natural flavors while adding a sweet, sticky finish that tantalizes the taste buds. This harmonious balance between crunch and glaze is what makes Crunchy Honey Glazed Chicken Wings a beloved choice among food enthusiasts and casual eaters alike.
Chicken wings have carved out a prominent place in popular cuisine worldwide. From the classic Buffalo wings in the United States to the savory soy-glazed varieties found in Asian cuisine, chicken wings are a versatile dish that can be adapted to suit any palate. Their popularity soars during special events, especially during the Super Bowl or other sporting events, where they are often the centerpiece of any gathering. With this recipe, you can easily impress your guests and elevate your culinary skills to new heights.
Understanding Chicken Wings
Before diving into the cooking process, it’s important to understand the nutritional value and culinary versatility of chicken wings. Chicken wings are not only delicious but also a great source of protein, making them a satisfying option for those looking to indulge without compromising on nutrition. In addition to being high in protein, chicken wings contain essential vitamins and minerals, including B vitamins, phosphorus, and selenium. However, as with any dish, moderation is key, especially when paired with rich sauces.
The popularity of chicken wings can be traced back to their humble beginnings. Originally considered a byproduct of poultry processing, wings have transformed into a culinary staple across various cultures. Different cooking methods, including frying, baking, and grilling, offer unique textures and flavors, allowing for a wide range of preparation styles. For this recipe, we will focus on achieving that coveted crunch through a careful baking process, enhanced by a few key ingredients.
Ingredients Breakdown
To create the perfect Crunchy Honey Glazed Chicken Wings, understanding each ingredient’s role is crucial. Let’s break down the components that contribute to this mouthwatering dish.
Chicken Wings: Selection Tips and Types
When it comes to chicken wings, selecting the right type can make all the difference. Look for fresh, high-quality wings from a reputable source. You can choose between whole wings or wing sections, which consist of the drumette, flat, and tip. For this recipe, whole wings or drumettes work best, as they tend to stay juicier during cooking. If you prefer more manageable pieces, feel free to cut the wings into sections before marinating.
Flour and Baking Powder: Achieving a Crunchy Coating
The secret to the signature crunch of these wings lies in the combination of flour and baking powder. Dredging the wings in a mix of all-purpose flour and baking powder creates a light coating that crisps up beautifully in the oven. The baking powder, in particular, plays a significant role in promoting browning and increasing the wings’ crunchiness. This simple yet effective method allows for a healthier alternative to deep-frying while still delivering that satisfying texture.
Spices and Seasonings: Flavor Development
A well-seasoned wing is a happy wing. The flavor profile of these Crunchy Honey Glazed Chicken Wings is enhanced by a blend of spices and seasonings. Common additions include garlic powder, onion powder, smoked paprika, and black pepper. Each of these ingredients contributes depth and complexity to the dish, ensuring that every bite is bursting with flavor. Feel free to adjust the spice levels to suit your taste; a little kick of cayenne pepper can add an exciting heat that complements the sweetness of the honey glaze.
Honey: Natural Sweetness and Health Benefits
The star of the glaze is, of course, honey. Not only does it provide a natural sweetness that pairs perfectly with the savory elements of the dish, but honey also boasts numerous health benefits. Rich in antioxidants and known for its antibacterial properties, honey can elevate the nutritional profile of your meal. When combined with other glaze ingredients, it transforms into a luscious coating that clings to the wings and enhances their flavor.
Soy Sauce: Umami and Saltiness
To balance the sweetness of the honey, soy sauce is introduced into the glaze. It adds a savory umami flavor and a touch of saltiness, creating a well-rounded taste that enhances the overall dish. Opt for low-sodium soy sauce if you’re aiming to cut back on salt without sacrificing flavor.
Apple Cider Vinegar: Acidity and Balance
Apple cider vinegar plays a vital role in balancing the sweetness of the glaze. Its acidity cuts through the richness of the chicken, preventing the dish from becoming overly sweet. Additionally, apple cider vinegar contributes a tangy flavor that complements the other ingredients and adds depth to the glaze.
Vegetable Oil: Importance in Crisping
Finally, vegetable oil is essential for achieving that desired crunch. A light coating of oil on the wings before baking ensures that they crisp up nicely in the oven. It also helps to promote even browning, creating a visually appealing dish that looks as good as it tastes.
Preparing the Chicken Wings
Once you have gathered all your ingredients, it’s time to begin the preparation process. The first step in creating the Crunchy Honey Glazed Chicken Wings is ensuring that the wings are properly dried. Excess moisture can hinder the crispiness of the final product, so patting the wings dry with paper towels is crucial. This ensures that the coating adheres well and that the wings crisp up beautifully during baking.
Step-by-Step Guide on Coating the Wings
1. Preheat the Oven: Start by preheating your oven to a high temperature, typically around 425°F (220°C). This helps to create a hot environment that encourages crisping.
2. Prepare the Coating: In a large bowl, combine your flour, baking powder, and selected spices. Whisk them together to ensure even distribution of flavors.
3. Coat the Wings: In another bowl, place the dried chicken wings and drizzle with a small amount of vegetable oil. Toss the wings to ensure they are evenly coated. Then, gradually add the flour mixture to the wings, tossing until each wing is fully covered in the dry mix.
4. Arrange on a Baking Sheet: Line a baking sheet with parchment paper or a silicone baking mat for easy cleanup. Arrange the coated wings in a single layer, ensuring they are not overcrowded. This promotes even cooking and maximizes crispiness.
5. Bake: Place the baking sheet in the preheated oven and bake for approximately 30 to 35 minutes, flipping the wings halfway through to ensure even browning. The goal is to achieve a golden-brown color and a crunchy texture.
As the wings bake, prepare the honey glaze by combining honey, soy sauce, apple cider vinegar, and any additional spices in a saucepan. Heat the mixture over medium heat until it starts to bubble, allowing the flavors to meld together. This glaze will be the crowning touch for your wings once they are perfectly cooked.
In the next part of this article, we will delve deeper into the final steps of glazing the chicken wings, serving suggestions, and tips for storage and reheating to ensure your Crunchy Honey Glazed Chicken Wings are a hit at any event. Stay tuned for the delicious conclusion!

Explanation of Flour Mixture and Its Components
To achieve that irresistible crunch on your honey glazed chicken wings, the flour mixture plays a pivotal role. The combination of all-purpose flour and cornstarch is what gives the wings their signature crispiness.
Components of the Flour Mixture:
– All-Purpose Flour: This is the base of your coating. It provides structure and helps the glaze adhere.
– Cornstarch: Including cornstarch in your flour mixture is key. It absorbs moisture, resulting in a lighter, crispier texture.
– Seasonings: Adding a pinch of salt, garlic powder, onion powder, and paprika can enhance the flavor profile. These spices not only add taste but also contribute to the overall appearance of the wings, creating a beautiful golden-brown color when baked.
Tips for Achieving Even Coating
Achieving an even coating is crucial for ensuring that every bite of your chicken wings is flavorful and crunchy. Here are some tips to help you master the coating technique:
1. Pat Dry the Wings: Always start by patting your chicken wings dry with paper towels. This removes excess moisture that can prevent the coating from adhering properly.
2. Use a Ziploc Bag: For an even coating, place your seasoned flour mixture in a large Ziploc bag. Add the wings, seal the bag, and shake vigorously. This method ensures that the wings are evenly coated without the mess of using your hands.
3. Double-Dip for Extra Crunch: For those who crave extra crunch, consider double-dipping your wings. After the initial coating, dip them in a mixture of beaten egg and water, then coat them in the flour mixture again before baking.
Baking Process for Perfect Wings
Preheating the Oven: Why Temperature Matters
Preheating your oven to 425°F (220°C) is essential for achieving perfectly baked chicken wings. The high temperature helps to render the fat from the skin, resulting in a crispy exterior while keeping the meat juicy and tender inside. This temperature also helps to caramelize the sugars in the honey glaze later on, enhancing the flavor of the wings.
Role of Wire Rack in Baking: Air Circulation for Crispiness
Using a wire rack is highly recommended when baking chicken wings. Placing the wings on a wire rack allows for air circulation all around the chicken, preventing them from sitting in their own juices. This promotes even cooking and browning, ensuring that the wings come out perfectly crispy. If you don’t have a wire rack, you can place the wings directly on a baking sheet lined with parchment paper, but the results may not be as crispy.
Timing and Flipping: Achieving Even Cooking and Browning
Cooking your chicken wings for about 40-45 minutes will yield the best results. It’s important to flip the wings halfway through the cooking time to ensure they brown evenly on both sides. Use tongs to gently turn the wings over, allowing for consistent exposure to the heat and promoting an even crisp.
Creating the Honey Glaze
Ingredients Needed for the Glaze
A delicious honey glaze complements the crunchy wings beautifully. Here’s what you’ll need to make the glaze:
– Honey: The star ingredient that adds sweetness and a shiny finish.
– Soy Sauce: This adds a savory depth to the glaze.
– Garlic: Freshly minced garlic enhances the flavor and aroma.
– Rice Vinegar or Apple Cider Vinegar: This adds a touch of acidity to balance the sweetness.
– Sesame Oil: A few drops provide a nutty flavor that rounds out the glaze.
– Red Pepper Flakes: Optional, for adding a bit of heat.
Cooking Techniques for Thickening the Glaze
To create the perfect honey glaze, combine all the ingredients in a small saucepan over medium heat. Allow the mixture to come to a gentle simmer, stirring occasionally. The key to thickening the glaze is to let it reduce for about 5-10 minutes. You’ll know it’s ready when it coats the back of a spoon. Be cautious not to let it boil too vigorously, as this can cause the honey to scorch and become bitter.
Tips for Balancing Flavors in the Glaze (Sweet vs. Savory)
Balancing flavors is essential in creating a glaze that shines. If you find your glaze is too sweet, add a splash more vinegar or a dash of soy sauce to introduce some acidity. Conversely, if the glaze is too savory, a little extra honey will do the trick. Always taste as you go and adjust according to your preference.
Glazing and Serving the Wings
Techniques for Coating Wings in Glaze
Once your wings are perfectly baked and golden brown, it’s time to glaze them. Place the wings in a large mixing bowl and pour the honey glaze over them. Toss gently to coat all the wings evenly. For a thicker coat, you can also brush the glaze onto the wings using a basting brush. This method allows for an extra layer of glaze, intensifying the flavor.
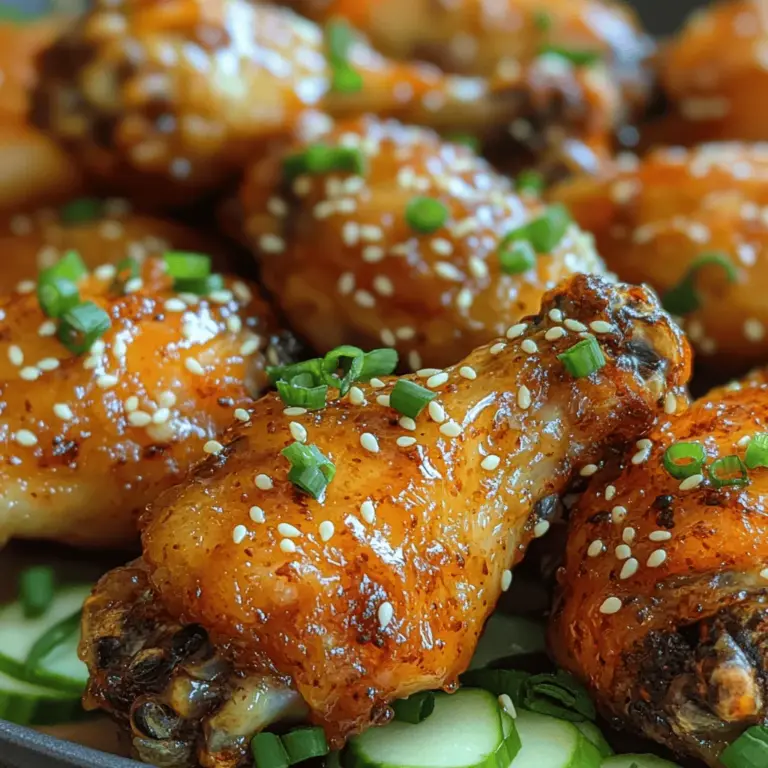
Importance of Garnishing with Sesame Seeds and Green Onions
To elevate your dish further, consider garnishing your glazed chicken wings with sesame seeds and chopped green onions. The sesame seeds add a delightful crunch and a nutty flavor, while the green onions provide a fresh, vibrant contrast. Not only do these garnishes enhance the taste, but they also make your wings visually appealing.
Presentation Tips for Serving
For a stunning presentation, arrange the glazed chicken wings on a large platter, and sprinkle the garnishes generously. Serve with a side of dipping sauces like ranch, blue cheese, or a spicy sriracha mayo for an extra kick. Adding some fresh vegetables, like carrot and celery sticks, can provide a refreshing crunch that complements the wings beautifully.
Variations and Customizations
Suggestions for Adding Different Spices or Heat Levels
If you’re looking to spice things up, consider incorporating different seasonings into your flour mixture or glaze. Adding smoked paprika or cayenne pepper can introduce a smoky heat that pairs well with the sweetness of the honey. For those who love experimenting, try adding spices like cumin or chili powder for a unique twist.
Alternative Glazes (e.g., Spicy, Teriyaki)
While honey glaze is a classic choice, there are numerous alternatives to keep your wings exciting. A spicy sriracha glaze made with honey and sriracha can add an extra layer of heat and flavor. Alternatively, a teriyaki glaze made with soy sauce, brown sugar, and ginger can offer a sweet and savory profile that is equally delicious.
Serving Suggestions (Sides, Dips)
When serving your honey glazed chicken wings, consider pairing them with sides that complement their flavors. Classic choices include coleslaw, potato wedges, or a fresh garden salad. Dips like ranch dressing, blue cheese, or a spicy aioli can take the experience to the next level, allowing guests to enjoy a variety of flavors.
Conclusion
In summary, the process of making crunchy honey glazed chicken wings is both rewarding and fun. From the careful preparation of the flour mixture to the art of glazing and presentation, each step contributes to creating a dish that is bursting with flavor. The satisfaction of biting into a homemade chicken wing, with its crispy exterior and sweet-savory glaze, is unparalleled compared to store-bought options.
Encouraging you to gather your friends and family for a delicious meal, these wings are perfect for sharing. The joy of cooking and enjoying food together creates lasting memories, and this recipe is sure to become a favorite in your household. So roll up your sleeves, get cooking, and enjoy every delicious bite of your homemade crunchy honey glazed chicken wings!
