Introduction
In the world of desserts, no-bake cheesecakes have carved out a special niche for themselves. These delightful treats have surged in popularity thanks to their ease of preparation, rich flavors, and the bonus of not requiring an oven. Whether it’s a summer gathering, a holiday celebration, or just a casual weeknight indulgence, a no-bake cheesecake is the perfect solution for satisfying sweet cravings without the hassle of baking.
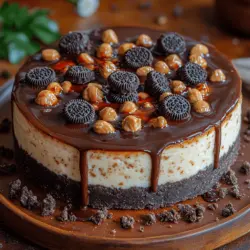
Today, we’re excited to explore the Oreo Peanut Butter Cup No-Bake Cheesecake, a dessert that takes the classic no-bake cheesecake to a whole new level. Imagine the rich, velvety texture of cream cheese mingling with the crunch of Oreo cookies and the nutty flavor of creamy peanut butter. This decadent dessert harmonizes the sweetness of chocolate, the savory depth of peanut butter, and the smoothness of cheesecake, creating an unforgettable treat that will impress your family and friends.
With its easy preparation and indulgent flavor, this no-bake cheesecake is an ideal choice for any occasion. Whether you’re celebrating a birthday, hosting a barbecue, or simply want to treat yourself, this recipe promises an effortless yet indulgent dessert that will leave everyone asking for seconds.
Understanding No-Bake Cheesecakes
No-bake cheesecakes are a delightful alternative to their baked counterparts, offering a creamy, luscious texture without the need for an oven. These desserts typically feature a base made from crushed cookies or graham crackers, combined with a rich filling made from cream cheese, sugar, and other flavorings. The absence of baking allows for a quick and easy assembly, making it a favorite among home bakers who crave a delicious dessert without the extensive time commitment.
One of the significant benefits of no-bake cheesecakes is their versatility. They can be flavored with a wide variety of ingredients, from fruits to chocolates, and can be customized to suit personal preferences or dietary restrictions. Additionally, the cooling time in the refrigerator allows the flavors to meld beautifully, resulting in a creamy and satisfying dessert that feels indulgent yet remains simple to prepare.
In terms of texture, no-bake cheesecakes are typically smooth and creamy with a lightness that comes from whipped cream or whipped toppings incorporated into the filling. This airy quality sets them apart from baked cheesecakes, which tend to be denser and richer. The combination of the buttery crust, creamy filling, and any added toppings creates a delightful contrast that enhances the overall experience of enjoying this dessert.
Key Ingredients and Their Roles
To create a luscious Oreo Peanut Butter Cup No-Bake Cheesecake, understanding the role of each ingredient is essential. Here’s a breakdown of the key components that bring this dessert to life:
Oreo Cookies
The foundation of our cheesecake is the Oreo cookie crust. The crispy chocolate cookies provide a perfect balance of sweetness and crunch, creating a sturdy base that holds the creamy filling. Their distinctive chocolate flavor complements the rich peanut butter and creaminess of the cheesecake, ensuring every bite is deliciously satisfying.
Peanut Butter
Peanut butter is the star flavor in this cheesecake, contributing a rich, nutty taste that enhances the overall profile of the dessert. It adds depth and creaminess, making the filling luscious and indulgent. The creamy texture of peanut butter also helps bind the filling together, ensuring a smooth consistency.
Cream Cheese
Cream cheese is the primary component that gives no-bake cheesecakes their signature creaminess. It provides a rich and velvety texture that pairs wonderfully with the other ingredients. When combined with sugar and peanut butter, it creates a delightful filling that melts in your mouth. For the best results, use full-fat cream cheese, as it lends a richer flavor and smoother texture.
Whipped Cream
The addition of whipped cream is crucial for achieving the light and airy texture characteristic of no-bake cheesecakes. Whipping cream to stiff peaks and folding it gently into the cream cheese mixture lightens the filling, making it more delicate and enjoyable. This step is vital in balancing the richness of the cream cheese and peanut butter, creating an indulgent yet not overly heavy dessert.
Optional Ingredients
While the above ingredients are essential, there are several optional components that can enhance both the presentation and flavor of the cheesecake. For instance, adding chocolate ganache or a drizzle of caramel sauce on top can elevate the visual appeal and add an extra layer of flavor. Choosing to incorporate mini peanut butter cups as a garnish not only adds to the aesthetic but also intensifies the peanut butter experience.
Step-by-Step Guide to Making Oreo Peanut Butter Cup No-Bake Cheesecake
Now that we understand the ingredients and their importance, let’s dive into the step-by-step process of creating the Oreo Peanut Butter Cup No-Bake Cheesecake. This guide will ensure you achieve the perfect dessert, with tips along the way to help you master each step.
Preparation of the Crust
The first step in making this no-bake cheesecake is preparing the crust. Begin by crushing the Oreo cookies into fine crumbs. You can do this by placing the cookies in a ziplock bag and using a rolling pin to crush them or by pulsing them in a food processor until they resemble sand. The finer the crumbs, the better they will adhere together when mixed with melted butter.
Once you have your Oreo crumbs, transfer them to a mixing bowl. Melt unsalted butter in a microwave or on the stovetop, then pour it over the crumbs. Stir the mixture until all the crumbs are evenly coated with butter. This step is crucial, as the butter acts as a binding agent that keeps the crust firm.
Tips for Achieving the Perfect Oreo Crumb Texture
For the best crust, aim for a texture that holds together yet still crumbles easily when served. If you find the mixture too dry, you can add a bit more melted butter, but be cautious not to overdo it, as too much butter can make the crust overly greasy.
Importance of Pressing the Crust Firmly
Once your crust mixture is ready, transfer it to a springform pan. Using the back of a measuring cup or your fingers, press the crumb mixture firmly into the bottom of the pan, ensuring it is evenly distributed. Pressing it down firmly will create a sturdy base that can support the creamy filling without falling apart.
Creating the Cream Cheese Mixture
With the crust prepared, it’s time to make the cream cheese filling. Start by placing softened cream cheese in a large mixing bowl. It’s essential that the cream cheese is at room temperature; otherwise, it will be challenging to achieve a smooth filling. Use a hand mixer or stand mixer to beat the cream cheese until it is creamy and free of lumps.
Techniques for Ensuring a Smooth and Creamy Filling
To achieve the perfect consistency, gradually incorporate powdered sugar into the cream cheese while mixing. This step helps to sweeten the filling without creating a grainy texture. Continue mixing until the sugar is fully incorporated and the mixture appears smooth and glossy.
Importance of Incorporating Powdered Sugar Gradually
Adding powdered sugar gradually also allows you to control the sweetness of your cheesecake. Taste the mixture as you go, ensuring it meets your preference for sweetness before moving on to the next step.
Whipping the Cream
In a separate bowl, whip heavy cream until it forms stiff peaks. Start at a lower speed to incorporate air gently, and then increase the speed until the cream thickens. Be cautious not to over-whip, as this can lead to a grainy texture rather than the lightness desired in a no-bake cheesecake.
How to Achieve Stiff Peaks and Avoid Over-Whipping
To determine if your cream is whipped to stiff peaks, lift the whisk or beaters out of the cream. The peaks should stand upright without collapsing. If you notice any graininess or separation, you’ve likely over-whipped. If this happens, you’ll need to start over with new cream.
With these detailed steps, you’re well on your way to creating a delicious Oreo Peanut Butter Cup No-Bake Cheesecake. Each component, from the crust to the filling, plays a vital role in achieving the perfect dessert. As you prepare this indulgent treat, keep these tips in mind to ensure a delightful experience that will wow your taste buds. Stay tuned for the next part, where we will cover assembling the cheesecake, adding optional toppings, and answering common questions about this decadent dessert.

Combining the Mixtures
Once you have prepared the cream cheese mixture and whipped cream separately, the next step is to combine them. Begin by gently folding the whipped cream into the cream cheese mixture. This process is crucial as it helps incorporate air into the filling, resulting in a light and fluffy texture.
To fold effectively, use a rubber spatula or a large spoon. Start by adding about one-third of the whipped cream to the cream cheese mixture. This initial addition will help lighten the cream cheese mixture, making it easier to incorporate the rest of the whipped cream. Use a gentle motion to combine the ingredients, sweeping around the edges and underneath the mixture. Rotate the bowl as you mix to ensure all ingredients are evenly combined.
Techniques for Folding to Maintain Airiness
Maintaining airiness during the folding process is essential for achieving the right texture in your no-bake cheesecake. The key is to be gentle and avoid vigorous stirring, which could deflate the whipped cream.
Here’s how to do it:
1. Cut and Fold: When folding, imagine cutting through the mixture with your spatula. Lift the mixture from the bottom and fold it over the top, turning the bowl as you go.
2. Rotate the Bowl: As you fold, rotate the bowl with your other hand to ensure an even mix and help the ingredients incorporate without losing volume.
3. Check for Streaks: Continue folding until you no longer see streaks of whipped cream. The mixture should be uniform in color and texture, but still light and airy.
Importance of Incorporating Chopped Peanut Butter Cups
To elevate your Oreo Peanut Butter Cup No-Bake Cheesecake, it’s essential to incorporate chopped peanut butter cups into the filling. This addition not only enhances the flavor but also adds delightful texture, providing a pleasing bite in every slice.
Chop the peanut butter cups into small, bite-sized pieces. You can do this easily by placing them in the freezer for about 15 minutes before chopping; this hardens them slightly, making them easier to slice without getting too sticky. Once chopped, gently fold them into the combined cream cheese and whipped cream mixture, ensuring they are evenly distributed throughout the filling.
Assembling the Cheesecake
With your filling prepared, it’s time to assemble the cheesecake. Carefully pour the cream cheese and peanut butter cup mixture into the prepared Oreo crust. Begin by adding the filling to the center of the crust and use a spatula to spread it toward the edges.
Tips for Pouring and Smoothing the Cheesecake Filling
1. Layer Gradually: Pour the filling in layers if desired, to help prevent air bubbles from forming. Start in the center and work your way out.
2. Smooth the Top: After pouring, use an offset spatula or the back of a spoon to smooth the top of the cheesecake. This will give it a polished look and ensure an even surface.
3. Tap the Pan: Lightly tap the springform pan on the counter a few times to help settle the filling and eliminate any trapped air bubbles.
Importance of Evenly Distributing the Mixture
Even distribution of the filling is vital for achieving a uniform texture throughout the cheesecake. By ensuring that the chopped peanut butter cups are well mixed and that the filling is distributed evenly, you create a balanced flavor in every bite.
Take the time to smooth out the top of the cheesecake and check for any lumps or inconsistencies in the filling. This will not only improve the appearance of your cheesecake but will also enhance the overall eating experience.
Chilling and Serving
Once assembled, it’s crucial to let your cheesecake chill. Chilling is what allows the cheesecake to set properly, making it easier to slice and serve.
Importance of Chilling Time for Setting the Cheesecake
The chilling time is essential for the cheesecake to firm up. Without sufficient chilling, the cheesecake could be too soft and may not hold its shape when sliced.
Recommendations for Optimal Chilling Duration
For the best results, refrigerate your assembled cheesecake for at least 4 hours, though overnight is preferable. If you’re short on time, a minimum of 2 hours can suffice, but the texture may not be as firm.
How to Properly Remove the Cheesecake from the Springform Pan
After chilling, it’s time to remove the cheesecake from the springform pan. Here’s how to do it safely:
1. Release the Sides: Carefully run a knife around the edge of the cheesecake to loosen it from the sides of the pan. This prevents any sticking.
2. Remove the Ring: Open the springform pan and gently lift off the ring. If the cheesecake sticks slightly, use the knife to carefully release it.
3. Transfer Carefully: If desired, use a large spatula to transfer the cheesecake to a serving platter for a more polished presentation.
Serving Suggestions and Presentation Ideas
When it comes to serving your Oreo Peanut Butter Cup No-Bake Cheesecake, presentation can elevate the entire experience. Here are some suggestions:
– Slice Neatly: Use a sharp knife dipped in hot water to slice the cheesecake. This helps create clean edges.
– Plate with Style: Serve individual slices on dessert plates, and consider adding a dollop of whipped cream or a drizzle of chocolate sauce for added flair.
– Garnish: For an attractive finish, top each slice with crushed Oreos and a mini peanut butter cup. This not only adds visual appeal but also enhances the flavor.
Creative Ways to Garnish with Crushed Oreos and Mini Peanut Butter Cups
Garnishing your cheesecake can be as simple or elaborate as you desire. Here are a few creative ideas:
– Oreo Crust Rim: Crush additional Oreos and sprinkle them around the edge of the cheesecake for a decorative touch.
– Mini Peanut Butter Cup Platter: Arrange mini peanut butter cups around the base of the cheesecake for a fun presentation.
– Chocolate Drizzle: Melt some chocolate and drizzle it over the top before garnishing. This adds a rich finish that complements the flavors beautifully.
Flavor Variations and Customizations
One of the great things about this no-bake cheesecake is its versatility. Here are some ideas for personalizing your cheesecake experience.
Ideas for Personalizing the Cheesecake
– Swirls: Consider adding chocolate or caramel swirls on top of the filling before chilling. Simply drizzle the sauce over the top and use a toothpick to create beautiful patterns.
– Flavor Infusions: For a different flavor profile, mix in some vanilla or almond extract into the cream cheese mixture before combining with the whipped cream.
Alternative Crust Options: Chocolate Graham Crackers or Digestive Biscuits
While the Oreo crust is a classic choice, you can easily switch it up:
– Chocolate Graham Crackers: Use chocolate graham crackers for a richer flavor.
– Digestive Biscuits: Alternatively, digestive biscuits can provide a slightly different texture and taste.
Suggestions for Flavor Variations: Adding Chocolate or Caramel Swirls
You can also change the flavor profile by incorporating different swirls:
– Chocolate Swirls: Add melted chocolate to the filling or drizzle it on top.
– Caramel Swirls: Incorporate caramel sauce for a sweet contrast that pairs wonderfully with peanut butter.
Ideas for Different Toppings: Whipped Cream, Chocolate Drizzle, or Fresh Fruit
Toppings can also be varied based on your preference:
– Whipped Cream: A generous dollop of whipped cream on top of each slice adds a light touch.
– Fresh Fruit: For a fresher option, consider adding sliced strawberries or bananas on top, which can enhance the dessert’s flavor profile.
Nutritional Insights
Understanding the nutritional profile of your cheesecake can help you make informed choices, especially if you’re catering to dietary restrictions.
Overview of the Nutritional Profile of the Cheesecake
This no-bake cheesecake can be rich in calories due to its creamy ingredients, but it also offers some benefits from the peanut butter and Oreos.
Discussion of Ingredient Alternatives for Dietary Restrictions
For those with specific dietary needs, there are alternatives to consider:
– Vegan Options: Substitute traditional cream cheese and whipped cream with plant-based alternatives. Many brands offer delicious vegan cream cheese that works great in cheesecakes.
– Gluten-Free Options: Ensure that the Oreos you are using are gluten-free or substitute with gluten-free cookies that provide a similar texture and flavor.
Conclusion
Making and sharing this Oreo Peanut Butter Cup No-Bake Cheesecake is a joyful experience that brings friends and family together. This indulgent dessert not only satisfies your sweet tooth but also allows for creativity in the kitchen. From unique flavor variations to stunning presentations, your cheesecake can be a reflection of your personal style.
We encourage you to try this recipe for yourself and share it with loved ones. The combination of creamy cheesecake, crunchy Oreos, and rich peanut butter cups creates a treat that is hard to resist. Embrace the versatility of this recipe and let your imagination run wild in the kitchen. Enjoy the delightful process of creating this no-bake cheesecake and the smiles it will bring to those who share in its deliciousness!